Gaurav's Blog
Five Awesome Shell Utilities You Might Not Know About
25 Nov 2012 - 1 minute read
pgrep I always used to do “ps -ax | awk ‘/procname{print $1}’”, until I learnt that, we could simply do “pgrep procname”, and it will list the PIDs of all the processes with in their names.
pkill Similarly, I used to do “ps -ax | awk ‘/procname{print $1}’ | xargs kill”. As you must have guessed, this kills all the processes with names having ‘procname’ in them. But, a much simpler way is to just do “pkill procname”
zcat (and other related utilities) A lot of times, we need to grep through an archive. For this, we usually copy the archive somewhere else, grep on the resulting files, and then delete these files. zcat is much simpler, in the sense that, it uncompresses an archive and displays the result on the standard output. Now you can pipe the output to grep. Or, you can directly use zgrep! See some other related utilities here.
netcat netcat is a damn neat networking utility, which reads and writes data across the network using TCP. This is pretty nifty because we can pipe the output of a command to a process running on a different machine. This is extremely useful for monitoring. Thanks to Dhruv for introducing this one.
strace This utility can be used to print the list of systems calls (along with their arguments), being made by a program while it is running. How cool is that! See the output of ‘strace ls’ here.
Read moreLatency Numbers Every Programmer Should Know
15 Nov 2012 - less than 1 minute read
Here are some latency numbers that Peter Norvig thinks every engineer should know, and I whole heartedly agree (I was recently asked questions, which required the knowledge of these numbers, and my guesstimate was quite off the mark).
Edit: Here is a version with latency figures in ms, where appropriate.
Update: Here is a version showing the change in the numbers over the years.
Read morePutting my Twitter friends and followers on the Map
06 Nov 2012 - 2 minute read
I was quite impressed by the Visualizing Friendships post on the Facebook Engineering blog. So I decided to try out some data visualization myself. Of course, I am no longer an intern at Facebook (I interned there this summer. A post coming up soon), so I don’t have access to the millions of edges used in the map. So, I decided to do something similar for Twitter.
To plot anything I needed to find where my friends and followers were located. I used the Twitter API to find the list of my friends and followers. Then for each of the users, I found where they were located. This is not quite simple, since I want the location to be in the Latitude - Longitude format, and not everyone mentions their real locations in their Twitter profile.
The Twitter API had two basic problems:
- It is slow
- It places a lot of tight restrictions on how many results you can get at once.
But I waded through both of them, by (a) being patient (b) batching up requests in groups of size 100. This got me the public data about my friends whose profiles were publicly accessible. Now, a lot of them are living in places which might have multiple names, can be misspelled, do not accurately pinpoint the location of the person etc. For example, a friend who lives in Mumbai, can write ‘Mumbai’, ‘Bombay’ (the old name of Mumbai), ‘Aamchi Mumbai’ (a popular phrase, which translates to ‘Our Mumbai’), or ‘Maharashtra’ (the state), etc. Thankfully, I found the Yahoo! Placefinder API, which solves this problem more or less. We can query for the lat-long pair of a place, and it will return its best guesses for the same.
Once I did that, I could use R (thanks to Aditya for the suggestion) to plot the lat-long pairs on the World Map. The output isn’t quite pleasing to the eye, but it does the job.
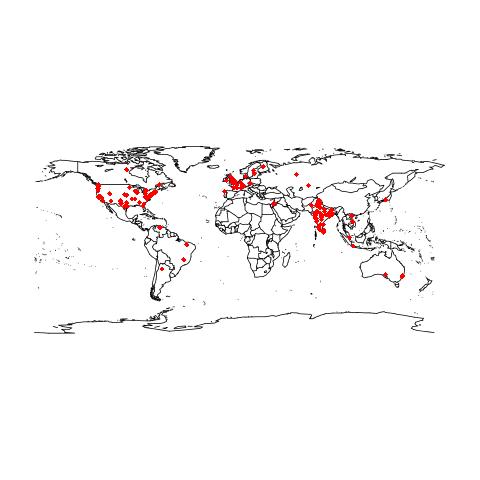
You can find the script that gets the Lat-Long pairs here.
Edit: Since Yahoo! is commercializing their PlaceFinder API, I think the Google GeoCoding API should be a suitable replacement. (Thanks to Dhruv for the suggestion).
Read more